Set up your workspace
Timelish launches this wizard after signup and billing. Numbers in the header show your place in the sequence. Finish on the same browser when possible saved answers return after short breaks.
Step 1: About your business
Tell Timelish how clients should recognise you and which regional defaults shape money, language, and clocks.
What you normally fill:
- Business name - displayed on your booking website and in client emails.
- Address - physical office location (optional).
- Organization domain - the unique prefix before
.timeli.shfor your website address. - Time zone - your personal/office time zone to anchor appointments, reminders.
- Language - controls what language your booking website will use.
- Country - your location's country.
- Currency - what currency to use for prices.

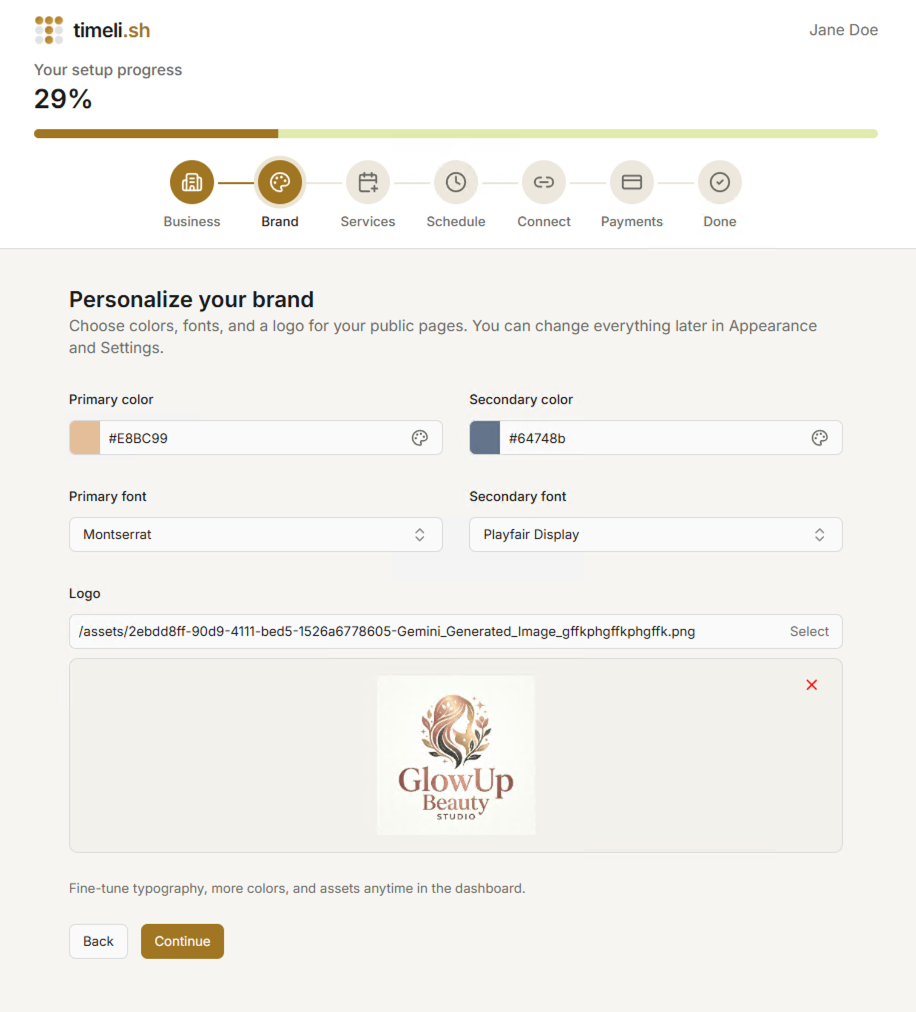
Step 2: Look and feel
Choose your color palette, typography, logo, and favicon to make your booking website stand out.
- Pick your main and secondary colors.
- Select font pairs you can want your website to use (or leave default ones).
- Logo upload is optional but recommended for better branding
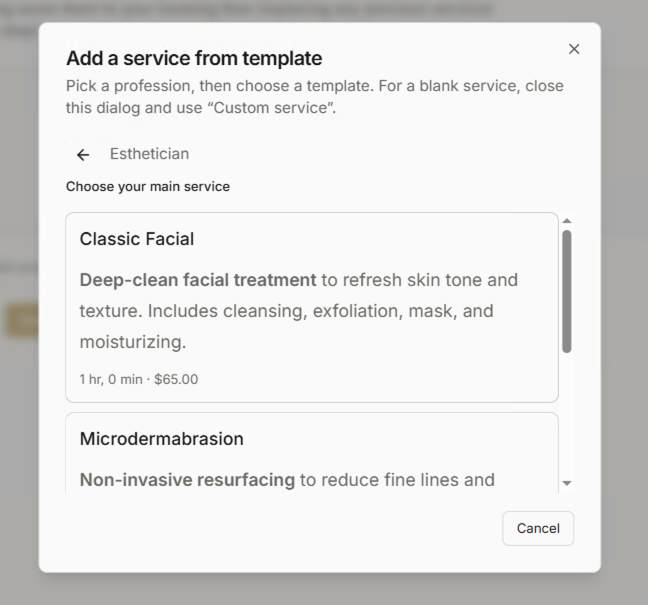
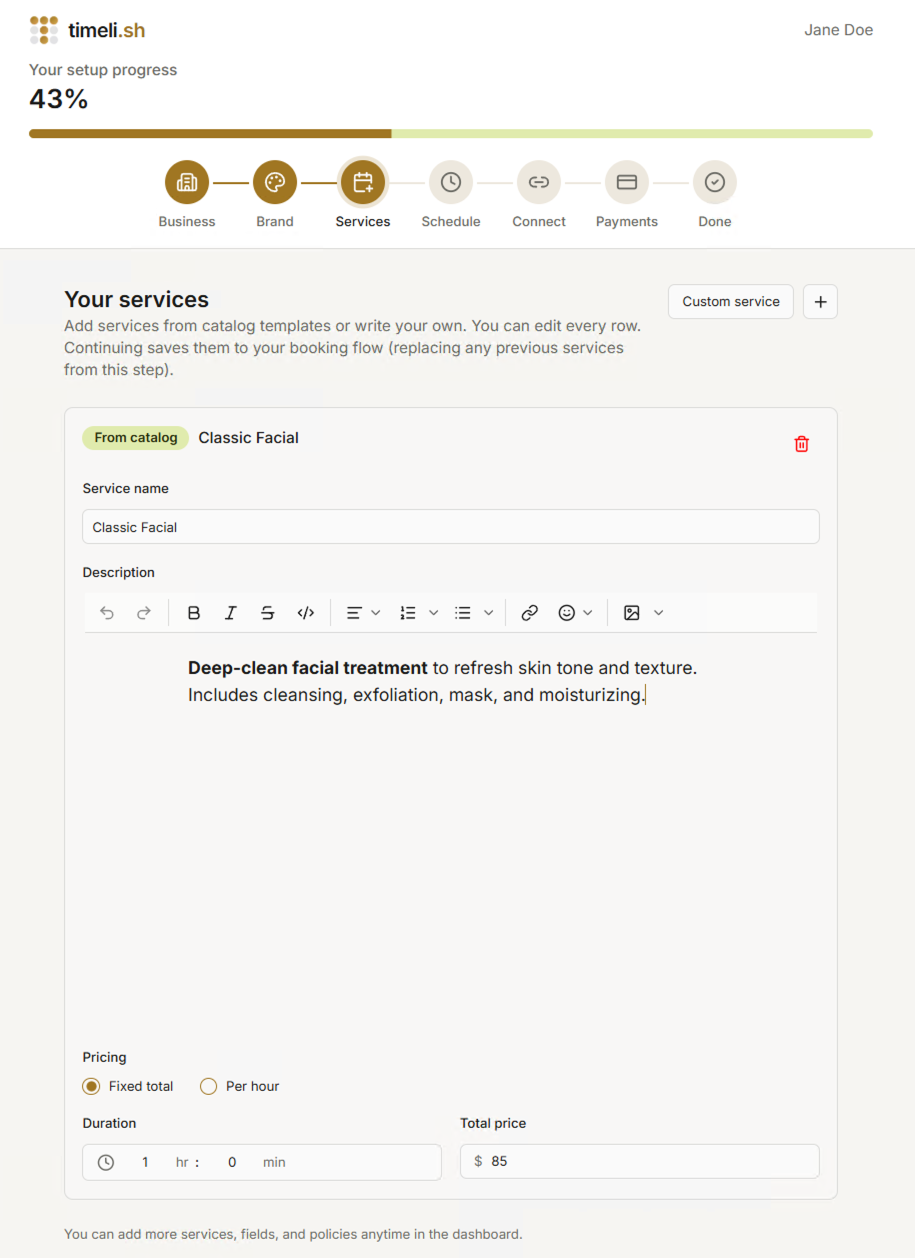
Step 3: Add your services
Timelish needs at least one bookable offering to start. You can create a completely new one or select a template to help you jump start your website.
Suggested professions
Profession catalogues preload names, descriptions, durations, pricing. Select one that matches your profession closelest and make it match what you offer.
Fine tuning
- Click on "Custom service" to create empty or plus button to select service template.
- Add a unique service name, like "Classic Facial" or "Initial consultation".
- Add a service description - make it brief but easy understandable to your customers.
- Choose fixed or hourly pricing to match quotes you quote in real life.
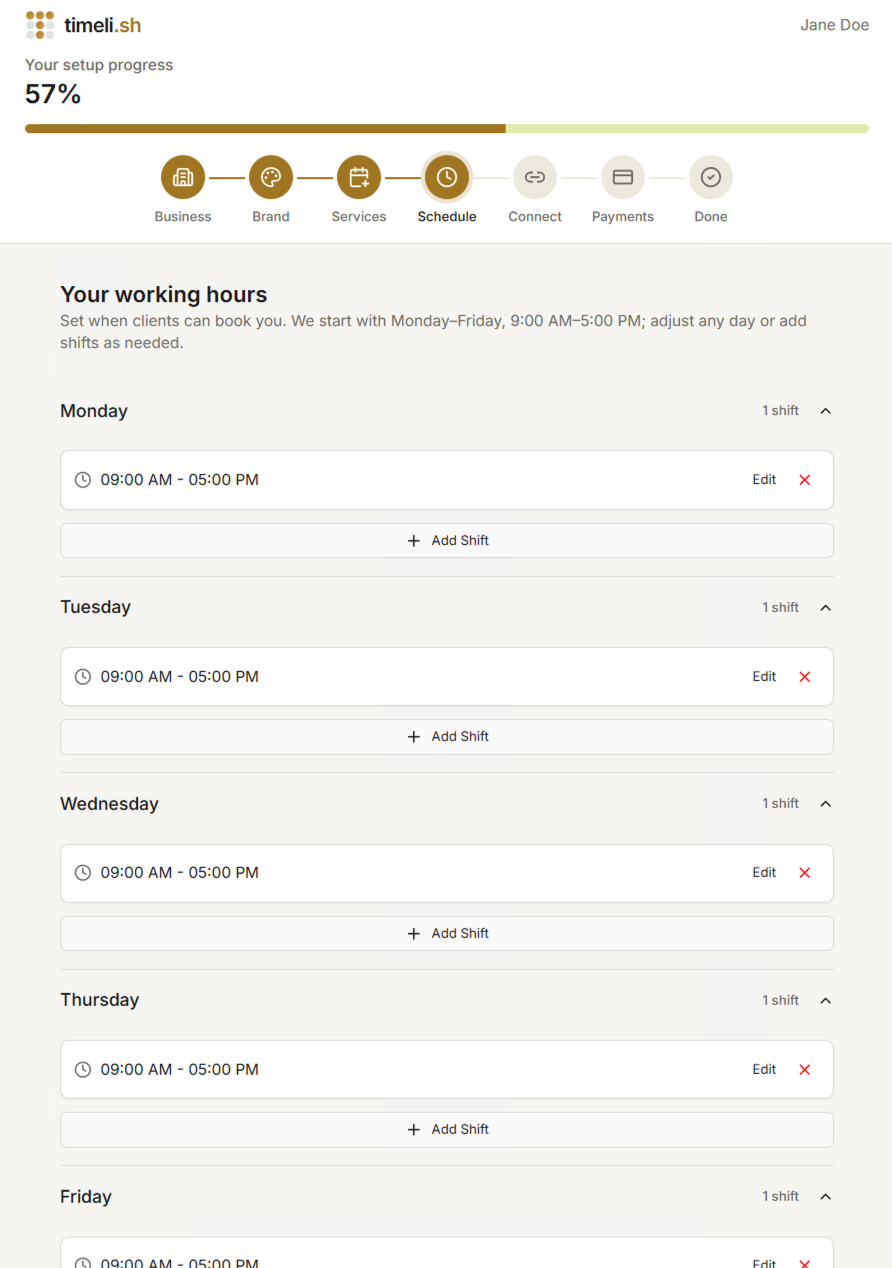
Setup 4: Set your schedule
The installation wizard will suggest the default schedule - Monday till Friday, 9am-5pm. You can adjust the schedule to match your working hours by adding shifts to each week day. You can adjust the schedule later in your dashboard or install app that will allow you to have more custom schedule (for example, Weekly Schedule to set custom schedule on week-by-week basis)
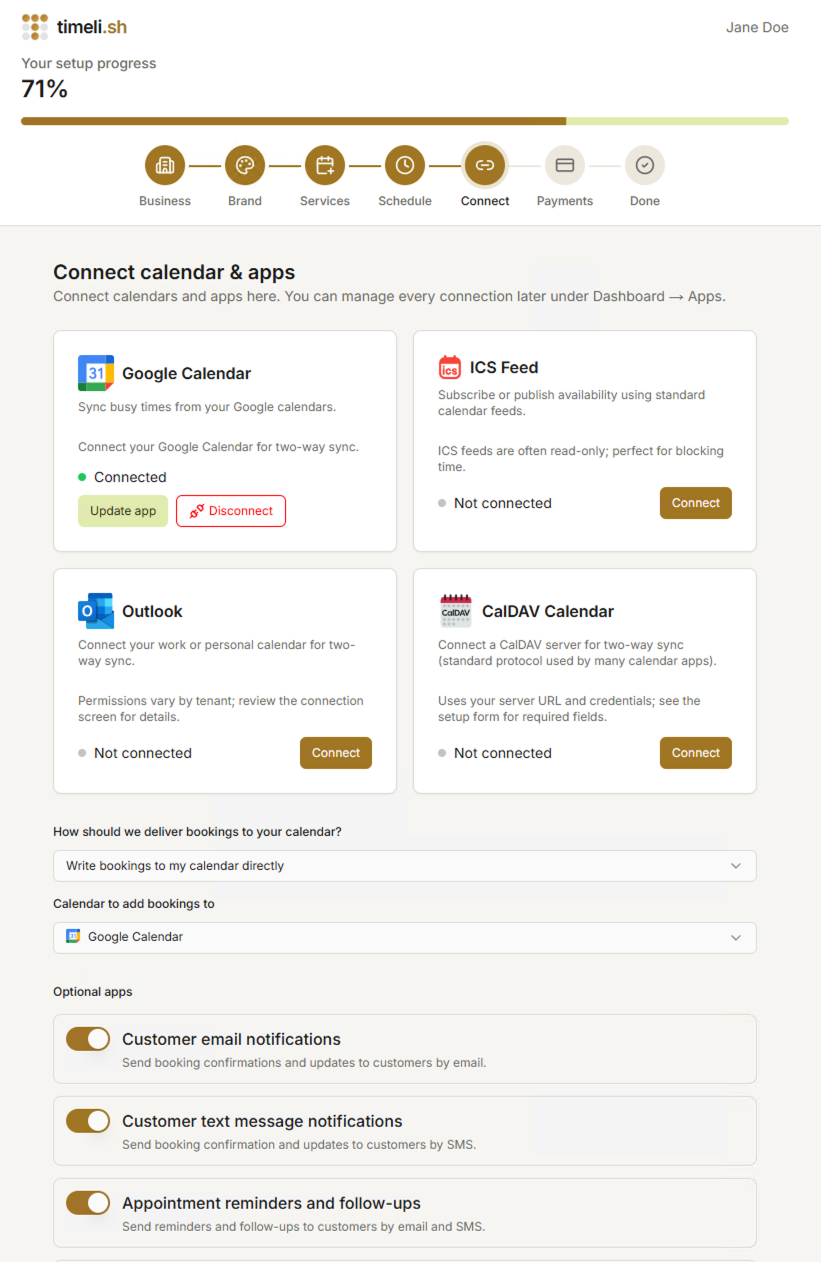
Step 5: Connect calendar & apps
In this step, Timelish asks: "How should we deliver bookings to your calendar?"
This means:
- How new appointments should appear in your calendar.
- Where new appointments should be saved.
- Which calendar should be used to mark you as busy.
- Which meeting app should create a video link for online appointments.
What are possible options?
- Do not send bookings to my calendar: You won't see bookings in your calendar (for example in your Google Calendar)
- Send bookings to my calendary by email: We will send you email with event attachment for new bookings, reschedules, and cancellations. Some email providers will automatically add this event to your calendar, or you can manually import it into your calendar
- Write bookings to my calendar directly: If you connect a compatible calendar app, you can receive new bookings, reschedules, and cancellations directly to you calendar. You will need to select what calendar you want to receive the bookings into.
What is a calendar app?
A calendar app is a connector between Timelish and your calendar account (for example Google Calendar or Outlook).
When connected, Timelish can:
- Add new bookings to your calendar automatically.
- Read your existing events to avoid double bookings.
- Keep booking updates (reschedule/cancel) synced.
What each calendar app does
- Google Calendar - Saves bookings to Google Calendar, reads busy times, and can add a Google Meet link for online appointments.
- Outlook - Saves bookings to Outlook/Microsoft 365 and reads busy times from there.
- CalDAV - Connects to calendars that support the CalDAV standard (often self-hosted or provider-specific calendars). Timelish can read and/or write bookings depending on that server.
- Calendar feed (ICS) - Uses a calendar URL feed to read busy times. Good when another system gives you a read-only calendar link.
Optional apps in this step
Based on your setup screen, you can enable optional apps with simple on/off switches.
- Customer email notifications - Sends booking confirmations and updates to your customers by email. Will create starter email templates.
- Customer text message notifications - Sends booking confirmations and updates to your customers by SMS. Will create starter text message templates
- Appointment reminders and follow-ups - Sends reminder messages and follow-ups by email and SMS. will create a starter email template and set an email reminder for day before an appointment.
- Waitlist - Lets customers join a waitlist when times are unavailable.
- Blog - Lets you publish updates and stories on your website.
- Forms - Adds intake forms, contact forms, and other custom forms.
- Gift Card Studio - Lets you design, sell, and manage gift cards.
- My account - Lets customers sign in (email or phone OTP) to manage their appointments.
These are optional. You can leave them off during setup and enable them later in Apps overview.
If you are unsure, choose the calendar you check every day. You can reconnect or switch later.
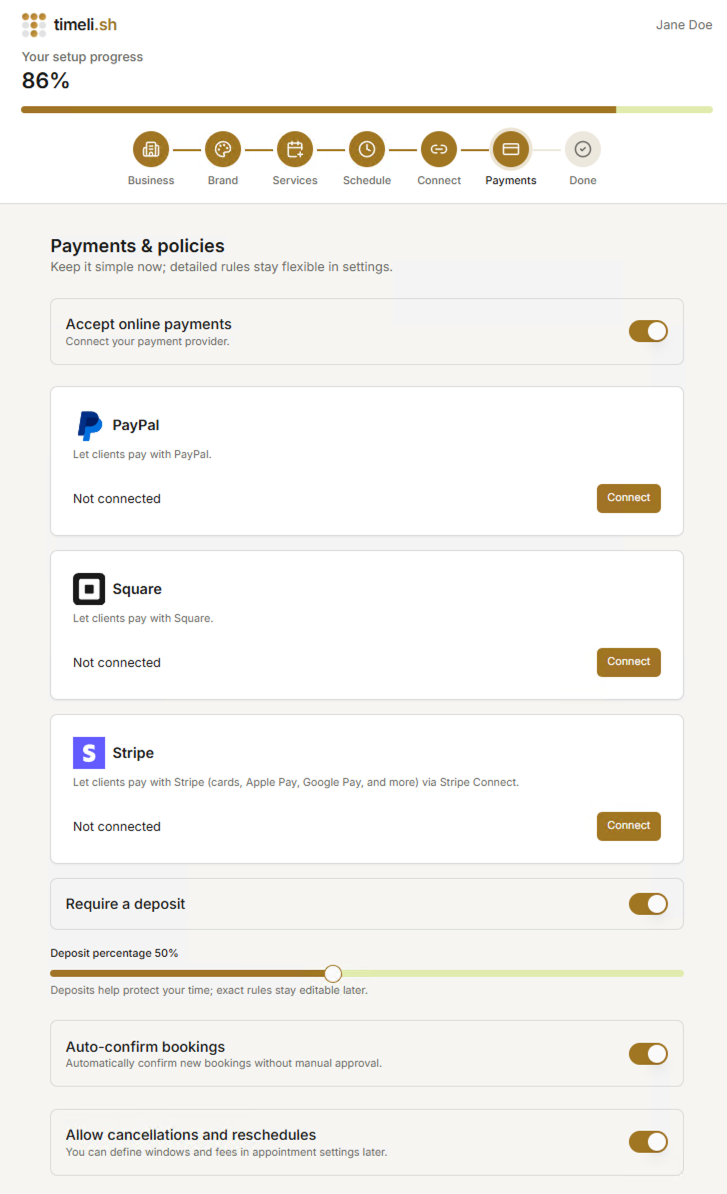
Step 6: Payments & Policies
During this step you can configure your payment processor, enable deposits and cancellations/reschedules, and turn on auto confirming bookings.
Payments
Connect one and only one payment processor that you are currently using for your business:
- PayPal - currently requires you to have PayPal business account, getting API keys from PayPal Developer dashboard for Extended Checkout. See more in PayPal app docs
- Square - will prompt you to sign in into your Square account and grant permissions
- Stripe - will prompt you to sign in into your Stripe account and grant permissions
Once you enable a payment processor app, you can enable deposit for your appointments and set deposit percentage. Set it to 100% to require full payment. You can always change it later in global or per service settings.
Auto confirm bookings
If you enable this option, your customers' appointment requests will be automatically confirmed. Otherwise, you will need to manually approve each request for customers to recieve confirmation email/message.
Allow cancellations and reschedules
Enable this option to allow customers cancel / reshcedule their appointments themselves. The default "allow all" policy will be created. You can always fine tune your policies later in either global or per service settings.
Step 7: Finished
You are done!. You can now see to your dashboard. Before sharing your booking link publicly, do a quick setup check:
- Review services and prices.
- Check opening hours and availability.
- Confirm notifications and reminder templates.
- Test one booking end to end.
After the wizard checklist
- Open your public booking page in a private/incognito window and check the customer experience.
- Create one test booking and confirm calendar sync, reminders, and payment behavior.
- Continue with First steps, Settings, and Apps.